<body><script type="text/javascript"> function setAttributeOnload(object, attribute, val) { if(window.addEventListener) { window.addEventListener('load', function(){ object[attribute] = val; }, false); } else { window.attachEvent('onload', function(){ object[attribute] = val; }); } } </script> <div id="navbar-iframe-container"></div> <script type="text/javascript" src="https://apis.google.com/js/platform.js"></script> <script type="text/javascript"> gapi.load("gapi.iframes:gapi.iframes.style.bubble", function() { if (gapi.iframes && gapi.iframes.getContext) { gapi.iframes.getContext().openChild({ url: 'https://www.blogger.com/navbar.g?targetBlogID\x3d18649191\x26blogName\x3dlostpurl\x26publishMode\x3dPUBLISH_MODE_BLOGSPOT\x26navbarType\x3dBLUE\x26layoutType\x3dCLASSIC\x26searchRoot\x3dhttps://lostpurl.blogspot.com/search\x26blogLocale\x3den_US\x26v\x3d2\x26homepageUrl\x3dhttp://lostpurl.blogspot.com/\x26vt\x3d-8882249333908591649', where: document.getElementById("navbar-iframe-container"), id: "navbar-iframe" }); } }); </script>

lostpurl

Lost in a sea of yarn and needles. Lusting after handmade socks and all things lacy


Frog Pond and Onward

knittedsquare
knittedsquare,
originally uploaded by Suzann.
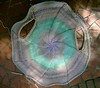
I took a really hard look at the Pinwheel Jacket. Had my daughter take pictures of me wearing it. And there was no way this was ever going to look attractive on me. I suggest if you are thinking of knitting this jacket you try this before you cast on the first stitch. Cut out a circle and then wrap it around a tube or a glass anything round. Look at how it fits in the front. Look at how it looks in the back. Will this be an attractive look for you?
So I frogged 6 balls of yarn and said goodbye to a zillion stitches. My mind kept trying to figure out how to flatten the top and bottom of the pattern, in order to create the width you need in the front. And speaking of frontage, if you have any at all or if you are older then 11 you are going to have problems covering it. Without the back dragging behind you like a train.
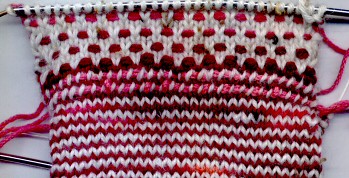
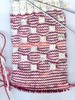
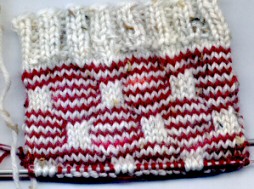
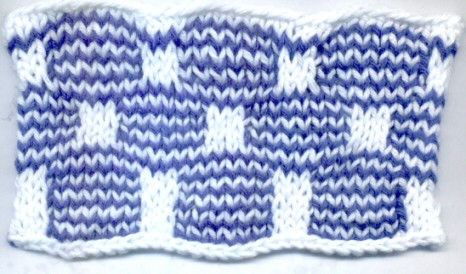
Nothing I tried really flattened out the top and bottom attractively. And then my brain woke up. A square, that is what is needed. Or better yet a rectangle. A quick look in my Mom's old knitting pattern book and this. The pattern is dead simple.
Now if you kept knitting this square you could make just the back. Or if you want you could leave the armhole spaces and continue around the front. I think that might be a lot to keep in your lap. So I think maybe a back and then two half squares for the front. This will allow of some armhole shaping if you like. The front will cover your front. You still have the swirl design and none of the circle problems.
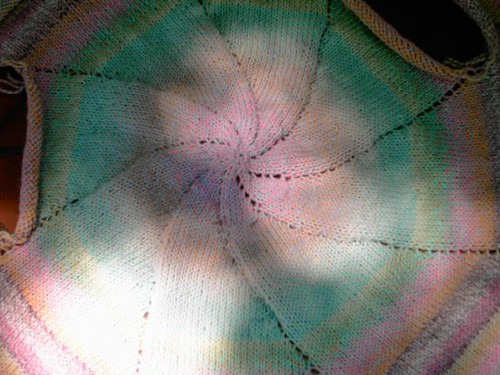
This sample is small and please excuse the awful center start. But I think you can see how it will work out.
I am not re-energized :D And I will cast on properly today with my pretty yarn.
If anyone is interested, I will post the stitch pattern.
Don't you love when it when your knitting stops kicking you in the gut :-}


Pinwheel Pain

I am now at the area that has the garter stitches. Now I have discovered that I should have only been increasing every six rounds, not every other round. Oh joy. If I have to frog 20 something rounds, I will frog the whole thing.

The directions get a bit vague after that. Knit like the baby version, except. Adult version knit until you have 30 stitches per section, then create armhole. Which leaves a gaping hole that gets more saggy as the jacket gets bigger. Solution, knit 30 stitches with waste yarn, purl back 30 stitches. Drop waste yarn and continue with jacket yarn, knitting in the stitches created with the waste yarn. You come back later and pick up those stitches and remove the waste yarn. But the jacket stays whole until then. Or you could just knit is round no armholes. When done measure the distance between your arms, pick up the stitches and then cut the yarn.
Continue knitting until you get to 42 stitches in each section. I missed this, and that is my fault not the designer. But the directions are shotgunned all over the page. Between the kiddie version and the adult version. You should start the garter part of the jacket. And

Purl 1 round.
Knit 1 round. Repeat these last 2 rounds 3 times. On the last knit round increase 1 st. every section by knitting into the front and the back of one stitch. Repeat these 6 rounds maintaining the colour change every 18th round. Repeat this pattern until the desired size. The sample sweater has 126 rounds and 7 colours.

Stupid me, didn't do the math. A increase one stitch every 6 rounds would have been helpful. But as I said this is my fault. So now I am at row 62 and have increased every other round.
I am not sure what I am going to do yet. I am angry at myself for not paying better attention.
I have been reading the Pinwheel KAL and apparently I am not the only confused ducky out there.
Nor is this the only Elann pattern that has caused eager knitters to go a bit mad.
I am going to watch Italy play. With any luck they will win and race around with their jerseys off. Hey you need to find your fun where you can. Today it is not in my knitting


Elann Pinwheel Sweater

pinwheelback
pinwheelback,
originally uploaded by Suzann.


The back so far. I am knitting it with some yarn I got from Ebay. http://stores.ebay.com/JOJOLAND-ONLINE, using a size 9 needle. The colors blend into one another. Each ball of yarn in the 10 I got is slightly different then it's fellow. Yet they all work together. The sweater is now as long as I would like, but not wide enough. I am thinking of turning the circle into an oval. Keeping the increases to the sides with the top and bottom sections on the same number of stitches. In other words, K 2tog, and then YO at the end of each section. This would maintain the swirl pattern, without the ends growing. Well the will of course grow slightly in length. I tried this idea out on some dishcloth cotton yarn and it works. The sides get wider at a faster rate then the top and bottom get longer.
If I do this pattern again, I will do the sleeves different. The method given in the pattern, causes the sleeve holes to stretch out of shape. That and the fact that you have YO at each end of the sleeve opening. I would stop the YO two rows before and after the sleeve placing. And I would do the sort of thing you do with Afterthought Heels. That is knit the number of stitches you want in a waste yarn. Drop the waste yarn and go on knitting. When you are ready to create the sleeves you pick out the stitches on the waste yarn, both sides and undo the waste part. Whenever I do any kind of provincial cast on, I always use a lifeline in the live stitches. Then when you unzip the waste yarn, no worry about your live stitches going south. I know lots of people can't be bothered with lifelines, but I can't be bothered chasing rogue stitches down my sweater or sock
Free pattern at http://secure.elann.com/ShowFreePattern.asp?Id=138024
A closeup of the yarn color variations


http://static.flickr.com/60/170911649_e9169d9d5f.jpg


Hiya Hiya Needles

A new needle from China. I just received my order from the Knitting Zone. I was mostly interested in the 2.25mm size needle, which is what I use for most socks. Up to now the only option for this size circ was INOX greys. And while a fine needle, the points are so sharp I have pierced my fingers a few time. Also the cable join was not as good as it could be. Of course the best would be if Addi had a 2.25 needle.
The Hiya Hiya is stainless steel. It has a long (5 1/2)needle with a tapered point. The needle is straight and the join is smooth and just about seamless. The cable is the clear plastic filament. I ordered the 24 inch length so I can't say for sure if longer lengths would curl up. On mine the cable is straight.
They also have bamboo, rosewood and ebony. These aren't available yet. Suppose to be coming soon.
The needles come in lengths from 12 inches to 60 inches. Sizes 000 to 15. Prices range from $7.50 to $9.00
I took some pictures of the points and join


Thermopilized The Heel Flap

Thermopilized The Heel Flap
Thermopilized The Heel Flap,
originally uploaded by Suzann.
First off there are too many patterns going on. I am frogging back to the box part of the pattern.
The heel flap is done with a woven stitch, not slipped stitch. How clever this is for a sock, we shall see. It is certainly fun to do. And the shaded red yarn gets a chance to shine. I will probably reverse the flap design so that it is white boxes instead of red on the heel flap. This would echo the pattern of the leg, and not add to the visual confusion. And were off to the froggy pond.
The two raised rows at the base of the heel flap are actually life lines. I will sadly be frogging past them. Just so my brain doesn't explode picking up all those tiny stitches, I will pick them up first with a needle and thread.
A close up of the woven stitch for the heel flap


Thermopilized the Back

Thermopilized the Back
Thermopilized the Back,
originally uploaded by Suzann.
I have just put in a life line. That bit of pinkish yarn to the left. And I am beginning the heel flap. Those rows or stripes are only on the back. The pattern continues on the front of the sock. As it is being knitted now the sock is a bit tight on me, and I have narrow feet. I think the next one I will go up a size needle to 2.50mm and I may add an extra stitch between each square. The other option is to only do the pattern on the front for the whole sock.
You may have noticed the ribbing is a bit on the short side. That was my impatience to start the pattern. I am seriously thinking of striping the cuff. Of course one doesn't want to make people blind with all the stripes :-)


Thermoplized

Named for my friend Angus Thermopile, who has this sort of eye popping effect on people. (
http://jasidog.com/forums/
Done in Regia Line Step Red and Marble. Size 2.25mm INOX needles over 60 stitches.
A really fun pattern to work. I am planning on striping the heel and toes. Or not, that might be stripe over kill


Diamond Variegated Yarn

Diamond Variegated Yarn
Diamond Variegated Yarn,
originally uploaded by Suzann.
The same diamond pattern done with variegated yarn and white. The variegated yarn is Sugar & Cream. You can see how the alternating purl and knit diamonds form a diagonal line. Although the pattern seems tight and bunched up when you are working it, a dip in some hot water and it flattens out nicely
I am still not happy with how the sides look.

On the other hand we have this

A Barbara Walker pattern, in which the work is slid back and forth on dpn or circular needles. Much like how ICord is made. A fun pattern. Sort of eye popping. I am thinking this would make a wild pair of socks. It would have to be worked in really fine sock yarn. These puppys would glow in the dark.


Diamond Pattern Dishcloth Pattern

Diamond Pattern Dish cloth
based on Barbara Walker’s Two-Tone Lattice pattern
Second Treasury of Stitches

Carry the alternate colors up the side of the work, by twisting on strand around the other. This pattern produces a very thick dense fabric, so don’t work to tightly or go up a needle size. I used size 6 and it was too tight. Next time I will go up to a size 7.

Using variegated yarn for yarn B gives a very interesting effect in the ss and reverse ss

Multiple of 6 stitches plus 4

Color A (which forms the lattice)

With Color A cast on 40 stitches, knit one row

Row 1 (Right side) With B, k 2, sl 1 wtib * k 4, sl 2, repeat from * end with k 4, sl 1, k2

Row 2: With B, p 2, sl 1 wyif, * p 4, sl 2, repeat from * end with p 4 sl 1, k2

Row 3: Repeat row 1

Row 4: Repeat row 2

Row 5: With A, repeat row 1

Row 6: With A, K 2, sl 1 wyif * k 4 sl 2, repeat from * ending with k 4 sl 1, k2

Row 7: With B, k 4 * sl 2 wyib, k 4, repeat from * end with sl 2, k 4

Row 8: With B, p 4 * sl 2 wyif, p 4, repeat from * end with sl 2, p 4

Row 9: Repeat row 7

Row 10: Repeat row 8

Row 11: With A, repeat Row 5

Row 12: With A, k 4, * sl 2 wyif, k 4, repeat from * end with sl 2 K 4

Repeat rows 1 – 12 , nine times for Dish Cloth

In the sample shown I alternated stockinet stitch with reverse stockinet stitch. You would set that up on row two, by knitting one diamond and purling the next.


Diamond Pattern Dishcloth

diamonddishcloth
diamonddishcloth,
originally uploaded by Suzann.
This is done in Lion Brand Blue and Sugar & Cream White. I used a size 6 needle. Could have gone up a size as it is very dense. The pattern is from one of Barbara Walkers stitch Treasuries. Although it is hard to see in the picture I alternated the diamonds. Stockinette Stitch with reverse Stockinette Stitch. The SS lay flat below the blue cross over stitches. The Reverse SS curves out above the blue stitches. I am working this now with a variegated yarn in place of the white. And the effect is that the pattern is running cross ways and up and down. Interesting. I am going to give this a shot using Sonata Prints and Sonata solids.